How to Shoot Product Videos That Sell: Your Ultimate Guide
Digital Marketing
How to Shoot Product Videos That Sell: Your Ultimate Guide
In a world where TikTok unboxing products faster than you can say "add to cart," and Instagram reels generate three times more engagement than static posts, one undeniable truth emerges: if your brand isn't harnessing the power of product videos, you're leaving significant revenue on the table.
Consider this: a staggering 92% of consumers turn to videos when researching purchases, and shoppable video ads can boost conversion rates by as much as 30%. But here's the catch—not all product videos are created equal. A shaky phone clip with poor lighting won't just fade into the background; it could actively undermine your brand's credibility.
Whether you're a solopreneur filming from your living room or part of a marketing team exploring cutting-edge AI tools, this guide will simplify the process of creating professional, conversion-driven product videos. We will break it down into six actionable steps:
- Why Do Product Videos Matter to Modern Marketing?
- How to Plan Your Product Video?
- What Equipment Is Needed for Professional Product Videos?
- How to Shoot Product Videos?
- How to Create Product Videos Using AI?
- Best Practices for AI Product Videos
Join us as we explore these topics and empower you with the insights you need to craft captivating product videos that truly resonate with your target audience. Let's get started!
Why Do Product Videos Matter for Modern Marketing?
Every roll through a feed is a battle against distraction. Static ads blur together, text-heavy posts get skipped—but a crisp product video? It cuts through chaos. By 2025, video isn't just content; it's consumer expectations. Here's why your brand can't afford to ignore it:
Your Audience's Brain Is Wired for Video
Humans process visuals 60,000x faster than text. But it's not just about speed—video taps into emotion. A close-up of a coffee maker's steam rising, the satisfying click of a luxury handbag clasp, or a founder explaining their mission in their own voice... These moments create visceral connections that static ads can't match.Trust Built in 15 Seconds or Less
Skeptical shoppers skip slogans but watch demonstrations. The video answers their silent questions:- "Does it work?" → Show the product in action (e.g., noise-canceling headphones silencing a busy street).
- "Is it worth it?" → Zoom into details (e.g., hand-stitched leather seams).
- Video brands see 30% higher conversions — not because they "sell harder," but because they prove value faster.
Your 24/7 Sales Team
A great product video works overtime. It lives on your website, auto-plays in social feeds, and even pitches customers through email campaigns. Take outdoor brand Patagonia: their minimalist videos highlighting product durability in extreme conditions don't just sell jackets — they sell a lifestyle, earning loyal customers who return season after season.Outsmart the Algorithms—and Your Competitors
Platforms reward video. Instagram prioritizes Reels, YouTube dominates search, and TikTok's "For You" page is a goldmine for discoverable content. While your competitors stick to carousel posts, a single viral product demo can catapult your brand into millions of feeds.
How to Plan Your Product Video?
Cut through the noise with a strategic blueprint—no budget or film crew required. Focus on clarity, emotion, and action to turn viewers into customers.
Strategy: Sharpen Your Focus
- Start with one core goal:
Avoid overwhelming audiences with one goal — drive sales, build trust, or inspire action.
For example, a meal kit brand might target busy parents by emphasizing pre-selected ingredients and 20-minute recipes instead of listing every recipe option. - Know your audience's hidden pain points:
Solve a problem they care about, not what you think they need. Busy parents prioritize time-saving proof over technical specs, while B2B buyers demand ROI clarity, not buzzwords.
- Start with one core goal:
Script: Hook Fast, Deliver Proof
- Hook (0-3 seconds):
Stop the scroll as a matter of urgency. Use a relatable problem ("Tired of Wi-Fi dead zones?"), a shocking visual (a cracked phone screen), or a provocative stat ("83% waste $50/month on X"). - Body (3-15 seconds):
Focus on one undeniable point of evidence. Show your product solving the problem—like a stain disappearing instantly—with simple language. Avoid technical terms; say "no scrubbing needed" instead of "hydrophobic nanotechnology." - Close (Last 2 seconds):
End with frictionless call-to-action. Pair urgency ("50% off today") with low risk ("Try free") to push indecisive viewers to act.
- Hook (0-3 seconds):
Storyboarding: Map the Journey
Build a visual roadmap that guides viewers from frustration to action:- Problem: Open with tension (e.g., a parent struggling with stains).
- Solution: Show your product in action — fast, clear, and decisive.
- Proof: Reinforce credibility through comparisons, demos, or testimonials.
- Action: End with a bold CTA and remove distractions (e.g., a single "Buy Now" button).
Keep it ruthlessly simple:
- Cut scenes that don't directly support your goal.
- Use text overlays for emphasis, not decoration (e.g., "10-second cleanup").
- Maintain one narrative thread — no jumping between ideas.
The best product videos aren't about flashy edits—they're about strategic storytelling. Narrow your goal, script for short attention spans, and storyboard with surgical precision.
What Equipment Is Needed for Professional Product Videos?
You don't need Hollywood gear to create polished product videos, but strategic investments in core tools will boost your quality and credibility. Here's a breakdown of the essentials, prioritized for impact:
Camera: Clean Capture, Crisp Imagery
What matters:- Sensor size (Full-frame or APS-C) for sharp detail and depth control.
- 4K resolution for future-proof footage and allows cropping in post-production.
- Manual settings to adjust exposure, focus, and frame rate.
Pro tip: Modern mirrorless cameras (e.g., Sony A7 series, Canon EOS R) offer cinematic quality at mid-range budgets. Smartphones work for social snippets, but limit dynamic range and low-light performance.
Lighting: Control Mood and Texture
Key setups:- Soft boxes or LED panels: Diffused light minimizes harsh shadows, critical for displaying textures (e.g., fabric, electronics).
- Backlighting: Separates products from backgrounds (e.g., rim light on a bottle).
- Adjustable color temperature: Match lighting to your brand palette (warm for luxury, cool for technology).
- Budget Hack: Use natural light near a window, but pair with a reflector ($20) to fill in shadows.
Tripod + Motion Gear: Stabilize Your Shots
- Fluid head tripod: Ensures buttery smooth pans and tilts for product reveal.
- Slider or motorized gimbal: Adds subtle movement (e.g., gliding over a skincare set) without distracting shakycam.
Skip this at your peril: Wobbly footage screams "amateur," even if your product costs $1,000.
Audio: Eliminate Distractions
- Lavalier mic: Clips on presenters for clear voiceovers.
- Shotgun mic: Mounts on camera to isolate audio in noisy environments.
- Deadcat Windscreen: Reduces muffled sounds for outdoor shooting.
The Golden Rule: Poor audio = lost trust. Viewers forgive mediocre visuals but won't tolerate buzzing or echoes.
Backdrop + Styling: Focus the Narrative
- Neutral surfaces: Foam boards, marble vinyl, or fabrics in muted tones keep the product in focus.
- Purposeful Props: Add context without clutter (e.g., coffee beans next to a mug, not a full latte art kit).
- Negative space: Frame products off-center to create visual breathing room.
Editing Software: Polish with Precision
- Adobe Premiere Pro or Final Cut Pro: Industry standards for color grading, speed adjustments, and transitions.
- DaVinci Resolve (Free version): Robust tools for beginners.
- Subtle sound effects: Enhance key actions (e.g., a "click" when opening a product lid).
Remember: Gear is a means, not a goal. Start with a smartphone, a light, and a tripod. Build your kit around what your product needs to look irresistible, not spec sheets.
How to Shoot Product Videos?
With your script, storyboard, and gear ready, it's time to execute with precision. Follow these battle-tested techniques to capture footage that sells—no fluff, just results.
Setting up for Success
Call in your environment first:- Clean your product (wipe fingerprints, dust, and lint). A single stray hair ruins a close-up.
- Lock down your tripod to avoid accidental bumps. Use a mental level to ensure straight lines.
- Rehearse camera movements (pans, tilts, slider glides) before hitting the record.
Pro Tip:
Shoot in manual mode to maintain consistent exposure and focus. Auto settings often "hunt" mid-shot, creating amateurish flickers.Master Your Angles
Not all shots are created equal:- Hero Shot: Start with a large, well-lit frame showing the product in context (e.g., a coffee maker on a kitchen counter).
- Detail Shots: Zoom in on meaningful features — buttons, textures, logos — using macro lenses or close-up filters.
- Lifestyle Shots: Show the product in action (hands pouring from a bottle, someone wearing a backpack).
Avoid:
- Flat, straight-on angles (unless intentional for symmetry).
- Overcrowding the frame with props. Less is more.
Light as You Mean It
- Key Light: Position at 45° to highlight shape and texture. Use soft boxes for matte finishes, harder light for glossy surfaces.
- Fill Light: Reduce shadows without eliminating them (shadows add depth). Bounce cards work if you're on a budget.
- Backlight: Create separation from the background. For transparent items (glassware), backlighting makes them glow.
Add Motion with Intent
- Slider Shots: Glide horizontally or vertically to reveal features (e.g., sliding across a smartphone screen to show its size).
- Rotation: Spin the product on a turntable (or DIY lazy Susan) for 360° views.
- Pull Focus: Shift focus from foreground to background to guide the viewer's eye (e.g., a hand holding a ring → the ring's gemstone).
Pro Tip:
Shoot movement at 24fps for cinematic smoothness, but switch to 60fps+ for slow-motion shots (e.g., splashing water, unfolding mechanisms).Direct Attention Like a Pro
Show viewers what you want them to see:- Leading Lines: Use props or surfaces to point towards the product (e.g., a knife blade angled toward the edge of a cutting board).
- Field depth: Blur backgrounds with a wide aperture (f/2.8–f/5.6) to isolate the product.
- Color Contrast: Place the product against a complementary color background (e.g., a red dress on teal fabric).
Golden Rule:
Every shot should answer, "Why should the customer care?" If it doesn't highlight a benefit, cut it out.Shooting for Editing
Give yourself options in post-production:- Rolling Starts: Start recording 3 seconds before action begins to capture clean transitions.
- B-Roll Buffers: Shoot 10+ seconds of each setup—editors need breathing room.
- Coverage: Capture the same action from multiple angles (e.g., wide + close-up of a hand unboxing a product).
Avoid:
- Stop mid-shot to check playback. Trust your monitoring tools.
- Overlapping motions (e.g., a slider moves while pulling the focus). Do one at a time for consistency.
Quality Control on the Set
Don't wait for editing to fix errors:- Check Focus: Zoom in on your camera's LCD screen to ensure critical details are sharp.
- Monitor Audio: Use headphones to catch background noise (fridges, AC units) that you've tuned out.
- Reset Between Takes: Reset props, wipe surfaces, and re-check lighting after each shot.
Pro Workflow Hack:
Label your files as you shoot (e.g., "Watch_HeroShot_Take3").
How to Create Product Videos Using AI?
While traditional product video production requires time, resources, and technical expertise, AI tools like TopView are redefining what's possible—turning static assets into dynamic storytelling with unprecedented speed and scalability.
It's not about replacing human creativity; it's about augmenting it. TopView's AI-driven approach addresses a universal pain point: how to produce authentic product demos at scale without sacrificing brand consistency. The avatar becomes your virtual spokesperson, delivering scripted voiceovers.
Next, let's explore how to use TopView to enhance your product videos.
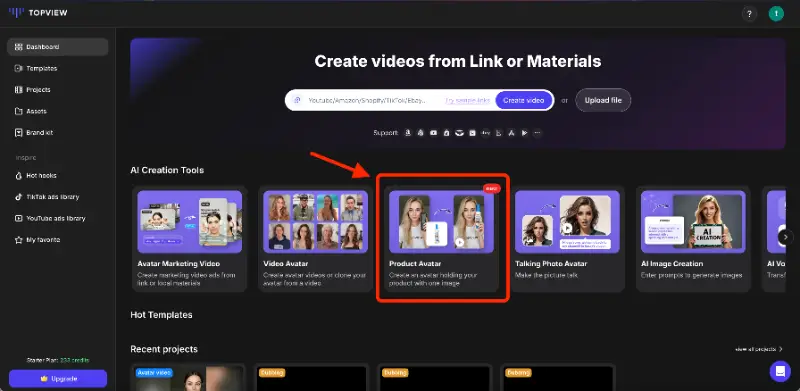
Step 1. Access the Avatar Tool
Log into your TopView dashboard and navigate to "Product Avatar" to get started.
Step 2. Choose Avatar & Gesture
Next, choose an avatar gesture that matches the size of your product.
Step 3. Upload Your Product Image
Click "Replace with My Product Image" and upload a high-quality photo of your product. Make sure the product is well lit and focused on the best results.
Step 4. Refine Product Placement
Use drag-and-drop tools to position the product precisely in the avatar's hands.
If you are not satisfied with the automatic background removal effect, you can opt to draw a mask manually. This allows you to precisely control the display area of the product, ensuring that it blends perfectly with the avatar's hands.
Step 5. Preview & Confirm Composite
Click "Confirm Product Position" to generate 3 preview images of the avatar holding your product. Select the most natural option and save it to your avatar library.
Step 6. Add Voiceover & Customization
The system will then redirect you to the "Video Avatar" tool. Enter your script, then customize the avatar's voice by adjusting language, gender, age, and style to match your brand style.

Step 7. Generate & Export
Hit "Generate" to render your final product demo. Download the file or share it directly to platforms — ready for ads, social media, or global campaigns.
Best Practices for AI Product Videos
TopView's Product Avatar turns product images into engaging AI video content—no actors or complex animations needed. Here are the scenarios where you can use these AI-generated product videos:
Social Media Ads for Instant Engagement
TopView's avatar generates attention-grabbing short videos for platforms like Instagram or TikTok. The AI spokesperson holds your product and pairs concise voiceovers with subtle gestures to highlight key selling points. Ideal for low-cost, high-impact campaigns that convert audiences quickly.E-commerce Product Page Demos
Transform product listings into dynamic explainer videos. The avatar guides viewers through features and specifications using synchronized voiceovers and gestures, such as emphasizing durability or unique design elements. Localized voiceovers ensure relevance to global audiences.Multilingual How-to Guides
Create instructional content without live shooting. The avatar demonstrates product usage through clear voiceovers and simple motions. Easily adapt scripts and tone for regional markets to enhance accessibility.UGC-Style Testimonial Videos
Repurpose customer photos into relatable review content. The avatar delivers casual, user-like commentary (e.g., praising a product's usability) with intentional imperfections, such as pauses or shrugs, to mirror organic social posts.B2B Product Pitches
Craft professional demo videos for business buyers. The avatar presents technical product details in an approachable tone, using gestures to direct attention to key features. Overlay additional visuals such as diagrams to enhance clarity.
Conclusion
This guide has outlined a pragmatic path to creating product videos that balance authenticity and technical polish. Whether shooting with a smartphone or using AI tools like TopView, the focus remains on clarity and resonance.
AI serves not as a replacement for creativity, but as an accelerator—streamlining tasks like editing, localization, and visual consistency, freeing creators to prioritize storytelling and audience connection.
As platforms evolve, adaptability defines success. The goal is not to chase trends, but to craft narratives that align with your brand's voice and your audience's expectations. With these insights, the next step is yours: refine, experiment, and let the tools enhance.