
What You Need Before Starting
Must-have tools
Node.js (v18+) — Runtime for Remotion. Grab it from nodejs.org.
Cursor (or Claude Code / Codex) — Your AI coding assistant. Any of these works.
Remotion — Install via npx create-video@latest. This scaffolds a ready-to-go project.
FFmpeg — Remotion uses it under the hood for rendering. Install with brew install ffmpeg (Mac) or download from ffmpeg.org.
Nice-to-have services
ElevenLabs — AI voice synthesis for natural-sounding voiceovers. Free tier available.
AssemblyAI — Speech-to-text for generating word-level subtitle timestamps. Also has a free tier.
GitHub Copilot — Helpful for inline code suggestions while working in Remotion files.
What you do NOT need
No React experience — Cursor writes the code for you
No video editing software
No design skills — define your brand colors and fonts once in a prompt file, and you're set
The Core Workflow (7 Steps)
Here's the big picture:
Blog post URL → Feed to Cursor → Cursor reads & breaks into scenes → Generate React components → Add animations → Assemble timeline → Voiceover + subtitles → Render MP4
Let's break each step down.
Step 1: Create Your "Director Prompt File"
This is the most important part of the whole workflow. You're defining your brand style so Cursor can follow it consistently.
Create a file called prompt.md in your project root. Here's what to include:
Visual specs:
Resolution: 1920×1080 (landscape) or 1080×1920 (vertical)
Frame rate: 30fps
Primary color: your brand color (e.g., #FF6B35 for orange)
Secondary color: e.g., #2D3436 (dark gray)
Fonts: pick a heading font and a body font (e.g., Inter + Noto Sans SC)
Animation specs:
Text entrance: fade in from bottom, 0.5s
Image entrance: scale + fade in, 0.8s
Transitions: fade to black, 0.3s
Pacing: medium density, 5–8 seconds per scene
Scene templates:
Title scene — centered large text + gradient background
Key-point scene — left icon + right bullet list
Screenshot scene — full-screen screenshot + bottom caption
CTA outro — logo + call-to-action button
Step 2: Feed the Blog to Cursor and Break It Into Scenes
Open your Remotion project in Cursor. In the chat, type something like:
"Read this article [your-blog-url], follow the brand guidelines in prompt.md, break it into 6–8 Remotion scenes, and write conversational voiceover text for each scene."
Cursor will come back with a scene breakdown. For example:
Scene 1 (0–6s): Title — "5 AI Coding Tools to End Overtime"
Scene 2 (6–14s): Problem intro — developers waste 2 hours/day debugging
Scene 3 (14–22s): Tool 1 — Cursor, the AI-native editor
Scene 4 (22–30s): Tool 2 — Claude Code, your terminal AI partner
Scene 5 (30–38s): Tool 3 — Codex, OpenAI's coding agent
Scene 6 (38–44s): Comparison overview
Scene 7 (44–50s): CTA outro
Step 3: Generate React Components for Each Scene
Cursor creates one .tsx file per scene. Your project folder ends up looking like this:
src/Root.tsx — orchestrates the overall timeline
src/scenes/TitleScene.tsx — Scene 1
src/scenes/ProblemScene.tsx — Scene 2
src/scenes/ToolScene1.tsx — Scene 3
src/scenes/ToolScene2.tsx — Scene 4
src/scenes/ToolScene3.tsx — Scene 5
src/scenes/CompareScene.tsx — Scene 6
src/scenes/CTAScene.tsx — Scene 7
src/assets/screenshots/ — any screenshots pulled from the blog
Step 4: Add Motion (Keyframe Animations)
Cursor auto-generates animation logic using Remotion's built-in useCurrentFrame() and interpolate() functions. This handles things like text fading in from the bottom, images scaling up on entry, and smooth transitions between scenes.
You don't need to write any of this yourself. Cursor handles it based on the specs in your prompt.md.
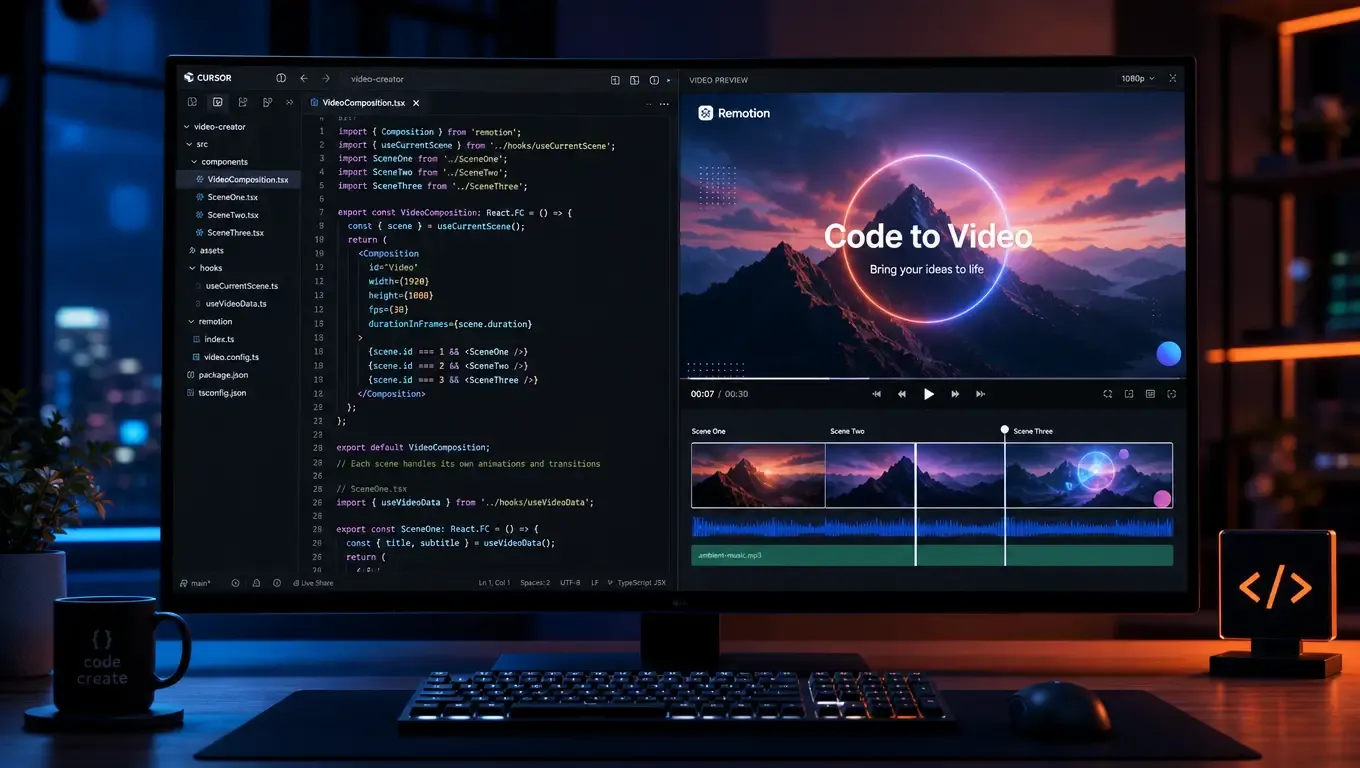
To preview, run npm run dev — Remotion Studio opens in your browser, and every code change refreshes the preview instantly.
Step 5: Assemble the Timeline
In Root.tsx, Cursor chains scenes together using Remotion's Sequence component. Each scene gets a start time and duration:
0s → TitleScene → 6s
6s → ProblemScene → 14s
14s → ToolScene1 → 22s
22s → ToolScene2 → 30s
30s → ToolScene3 → 38s
38s → CompareScene → 44s
44s → CTAScene → 50s
Step 6: Add Voiceover and Subtitles
Three things happen here:
Generate voiceover — Call the ElevenLabs API with each scene's spoken text. You get back natural-sounding audio files.
Generate subtitles — Send the audio to AssemblyAI. It returns word-level timestamps and an SRT subtitle file.
Burn subtitles into video — Load the SRT in Remotion and render synced subtitle text at the bottom of each frame.
Step 7: Render the Final Video
Run npx remotion render Root out/video.mp4 in your terminal.
A 1-minute 1080p video takes roughly 2–3 minutes to render on a standard MacBook. The output file can be dropped straight into Premiere or DaVinci Resolve if you want to do any final tweaks.
Common Pitfalls and How to Fix Them
Cursor generates components that don't compile — Usually a missing import or wrong prop type. Tell Cursor "fix the TypeScript errors" and it'll sort itself out.
Animations look choppy — Check your frame rate in the Composition config. 30fps is the sweet spot for most content.
Voiceover doesn't sync with scenes — Make sure each scene's durationInFrames matches the audio length. You may need to adjust timing after generating the voiceover.
Fonts don't load in the rendered video — Remotion requires fonts to be explicitly loaded. Use the loadFont() utility or import fonts via CSS.
Video file is too large — Use the --codec h264 flag and adjust the CRF value. Lower CRF = higher quality but bigger file.
Old Way vs. New Way: A Quick Comparison
Writing the script
Old: 30–60 minutes of manual scripting
New: 2 minutes — Cursor reads your blog and writes the script
Building the visuals
Old: 2–4 hours in After Effects or Premiere
New: 10–15 minutes — Cursor generates the components
Adding voiceover
Old: Record yourself or hire someone, 30–60 minutes
New: 5 minutes — ElevenLabs API call
Adding subtitles
Old: Manually type and sync in your editor, 20–40 minutes
New: 2 minutes — AssemblyAI auto-generates with timestamps
Total time per video
Old: 4–6 hours
New: 20–30 minutes
Going Further: Advanced Playbooks
One blog post, three platform versions
Define three parameter sets in your prompt.md:
Landscape 1920×1080 — for YouTube
Vertical 1080×1920 — for TikTok, Reels, and Shorts
Square 1080×1080 — for Instagram Feed
Cursor generates the code once. You render three times with different configs. Same content, three platforms covered.
Batch production: 10 posts in one go
Write a simple shell script that loops through your blog post files and calls Cursor for each one. Ten blog posts, ten videos, minimal manual effort. The key is keeping your prompt.md consistent so every output follows the same brand style.
Full automation: Render to publish
Take it one step further — after rendering, call the YouTube Data API to upload, then use a social media integration to post to TikTok and Reels. A fully hands-free pipeline from blog post to published video.
Key Takeaways
Remotion + Cursor isn't replacing video editors. It's replacing the repetitive grind of turning blog posts into videos manually.
The barrier is lower than you think. You don't need to know React or video editing. Just describe what you want in plain English.
The real value is reusability. Define your visual style once in prompt.md. Every future video follows the same look without extra effort.
2026 is the right time to start. Competitors are pouring into this space, the concepts are still fresh, and early content stands to capture long-tail search traffic.
Resources
Remotion official agent tutorial: remotion.dev/docs/ai/coding-agents
Remotion Agent Skills repo: github.com/remotion-dev/skills
FireBirdTech full case study: firebird-technologies.com
Patrick Zepeda walkthrough: "Code to Video Workflow" (Medium, May 2026)
ElevenLabs API: elevenlabs.io
AssemblyAI: assemblyai.com